

|
|
|
 May 14th, 2010, 17:20
|
#1 |
|
|
WE AWSS M4 Cleaning Guide (56k die) 05/14/2010
Download the PDF here:Download
z0ng's Mag Resealing Guide: LINK MAGAZINE CARE added at the BOTTOM OF THE GUIDE Note, this is not added to the pdf yet. WE AWSS M4 (Ver 3) Cleaning Guide -ShelledPants - May 14 2010 Forward Thank you for picking up this cleaning guide. It is a first draft. In the following pages are the tips and tricks I've picked up with the help of friends and team mates over the last year with the WE AWSS M4 airsoft gun [From now on referred to as "M4"]. You will find an idiots guide to field stripping the M4, a picture heavy guide to cleaning and lubrication, as well as maintaining the inner barrel. This is by no means an end all be all guide to using WE System, but it should get you on the right tracks. Cheers, Tom "ShelledPants" Hollis AMENDMENT Having gamed the WE M4 steadily for a while now... I've come to the conclusion that the only place that light silicone oil should be used is in the lubing of the magazines. Grenade oil should be used on the stabilizer rod, and Nozzle O-Rings. The light oil blows off too early and the gun will do everything from jam, chop bb's, gas out the mag, and even lock the nozzle in the brass tube so tight that I had to take the buffer tube off to clear it. All of this remedied with grenade oil. Definitions (IMPORTANT) Lube - To lightly oil or grease an area just enough to give a shine and appear "wet". Before lubing any moving parts, clean and dry them first. This ensures you are not compounding a dirty lubrication. Dry - Using a soft Micro Fiber cloth, clean the area so that it appears dry and has no dirt apparent. This should be done before lubing any parts in the gun. It's a good habit to only dry the areas you are about to lube, so that no part is left unlubed. It's better to forget to clean / lube something, than it is to put a dry part into the M4. Super Lube / Ultra Slick - Can also be found under another name, "Ultra Slick", is a silicone based PTFE lubricant which does not harm rubber. It is a self cleaning lubricant and is designed to be able to lubricate under high pressure. Ensure you buy the kind which does not contain Petroleum Distillates (Certain Petroleum OIls are ok). Try not to get this product into direct contact with the nozzle, or hopup of your gun. This lubricant is used on most of the moving parts of your gun, but not the o-rings or parts in direct contact with the o-rings. Silicone Oil - I use two different weights of 100% pure silicone oil, GBB Pistol weight (The kind you put into your magazines when you lubricate them with the Airsoft Innovations propane adaptor) and Grenade Weight (The kind you use to lubricate your Airsoft Innovations Grenade. Do not put this into your magazine. It is much heavier than the GBB weight oil.) These oils are used to lubricate o-rings and parts in direct contact with o-rings. 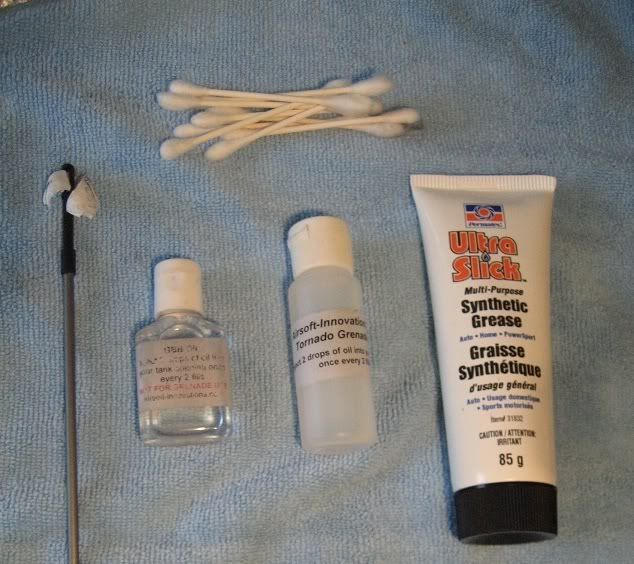 ----- Field Stripping 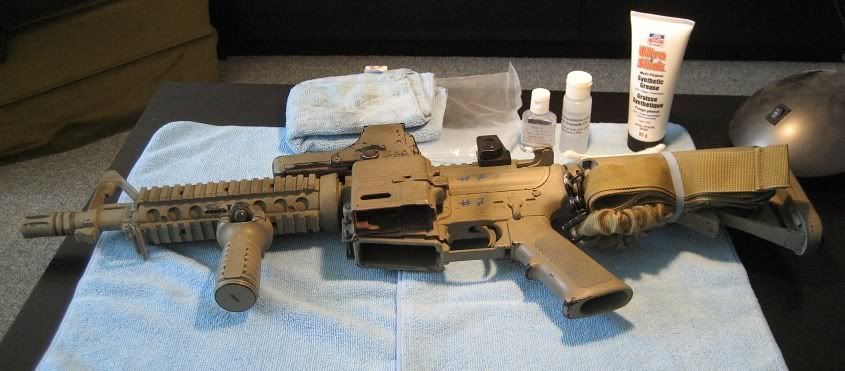 Above is a simple cleaning station set up the way I would clean my gun at home. You can make shift this setup in the field with a BDU laid out on a flat patch of grass, or on a table on the back of a backpack. There are not any small pieces to lose during this process, but there are plenty of parts to get unnecessarily dirty. So try to keep as much dirt out as you can, you'd be surprised at how much it can take before it fails... 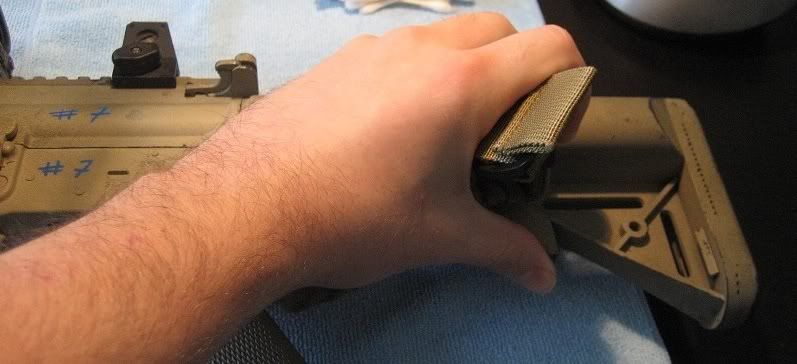 Remove the stock of the M4. Above you can see I use a crane style stock, it is removed by pulling the lever (instead of pushing) and pulling it off the buffer tube. The original stock from factory for the WE AWSS M4 is removed the same way. 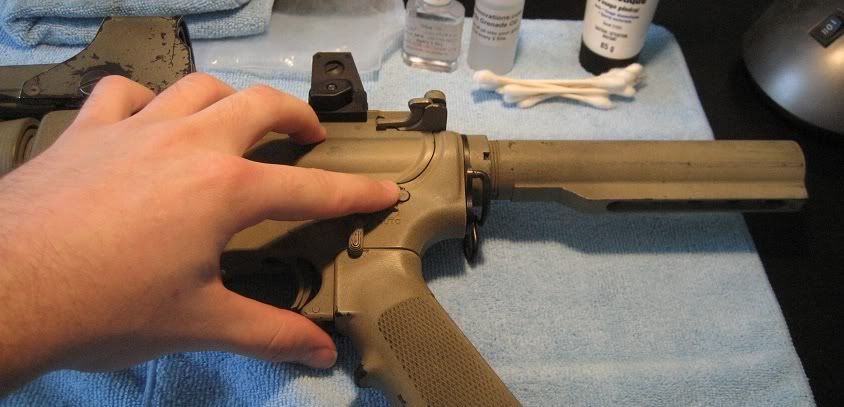 Now that the stock is removed. Ensure that the gun is not cocked. Do this by checking that the gun has no magazine inserted, pushing the bolt catch paddle to bring the bolt home, ensuring that the selector lever is set to SEMI, and then pulling the trigger. ***Do not try and open the gun with the bolt carrier locked to the rear (from an empty magazine, or by charging the bolt and locking it with the bolt catch), doing so may result in a broken gun or a jam. ***  With the selector switch set to SEMI, push the rear body pin to the other side of the body. It will not fall out (Unless there is a problem...), and will be retained by the internal mechanism. If you are having trouble pushing the pin out with your finger, use a small screwdriver or pen. It does not take much force, and a hammer is certainly not required. 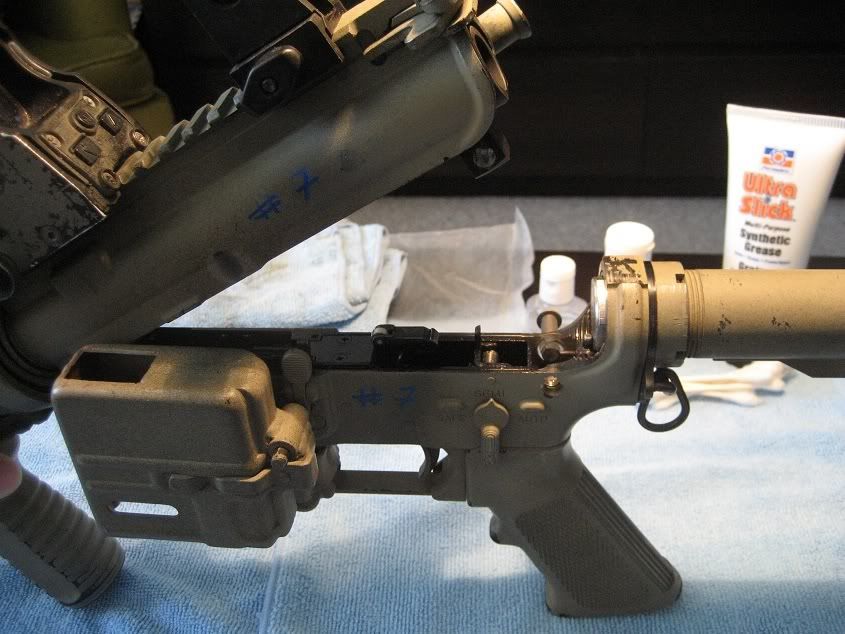 Break the gun open by tipping the front gun and pivoting the two halves on the front body pin. Have caution doing this step, as there are a lot of forces at work on the front body pin hinge. ***Clear lower plastic bodied M4's should be very careful as it is a likely breaking point. *** The rest of the guide can be performed with the M4 in this position, but for ease of demonstration, I will be breaking the gun into two halves. 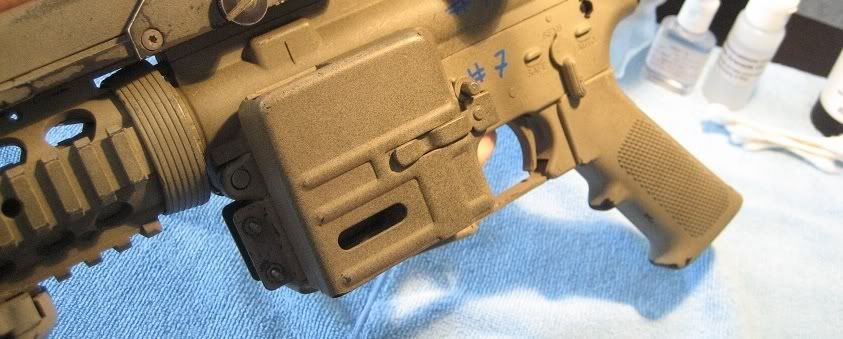 Press the gun halves together, and press out the front body pin. Separate the upper and lower, placing the upper on the table. Careful not to tip the gun in a way that the bolt and charging handle will fall out.  You will be left with a lower where the pins are exposed. Press then back into the body to prevent any breaks or unnecessary stress on the pins or body. 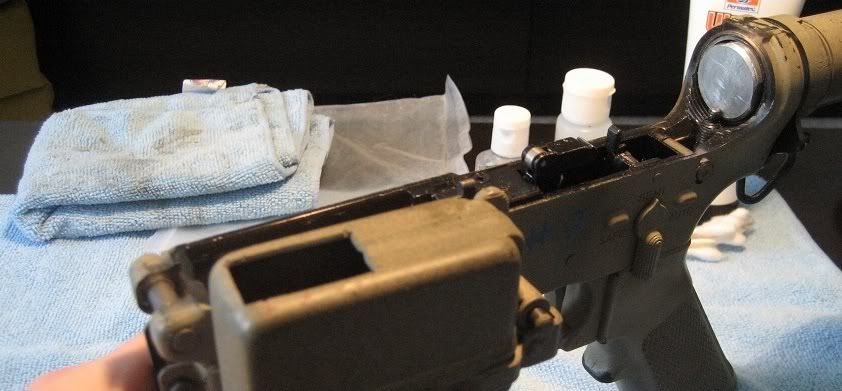  Back to the upper. A lot of people struggle with removing the bolt the first couple of times. This has to do with the not so obvious relationship with the bolt and charging handle. 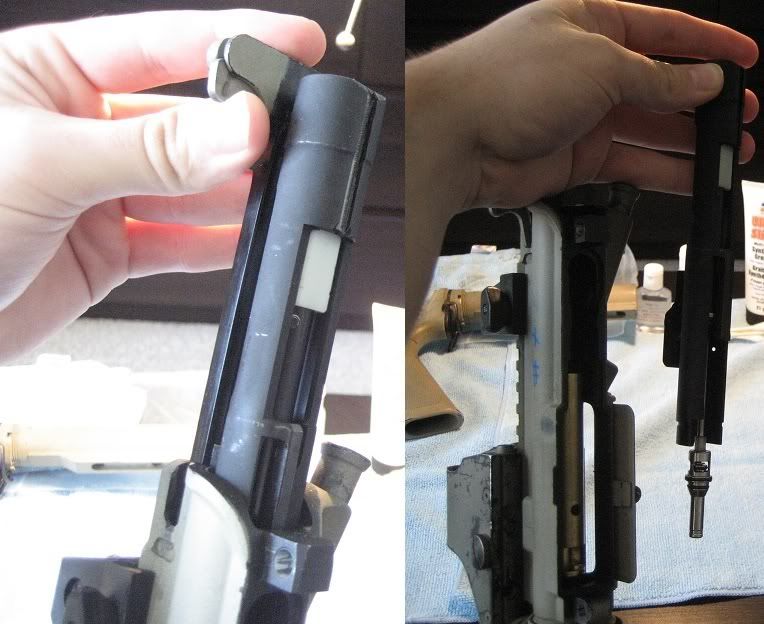 Pull back on the charging handle, the bolt will follow, when the charging handle hits the rear most of its journey, using your other hand, extract the bolt from the upper and let the charging handle slide back in.  Pull back on the charging handle to the rear most of its journey. 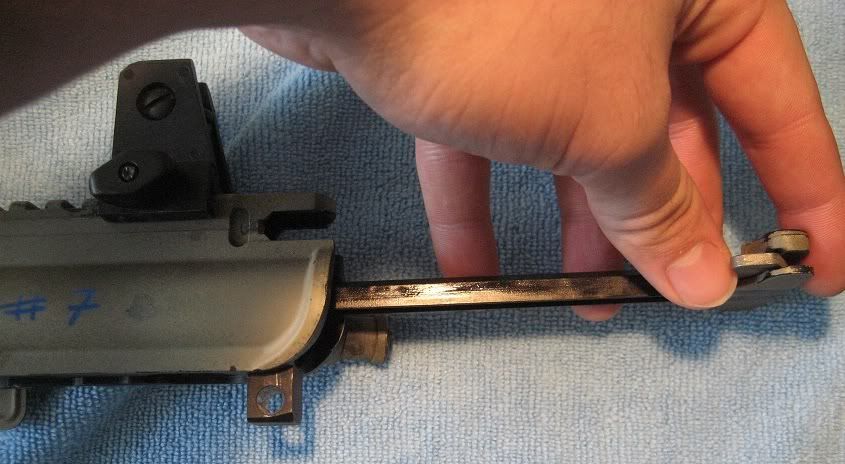 Press the charging handle down, there is a grove which it will be released from.  Remove the charging handle. 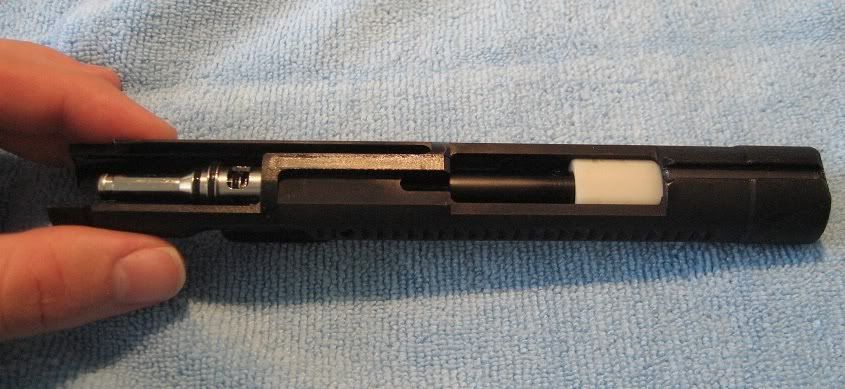 Let's take a look at the bolt carrier. On the lower side you will notice the stainless steel nozzle, and grooves for traveling along the lower and buffer pin.  Take care to dry off with a micro fiber cloth, the entire bolt. You will need to lube the red areas above and below with Super Lube.  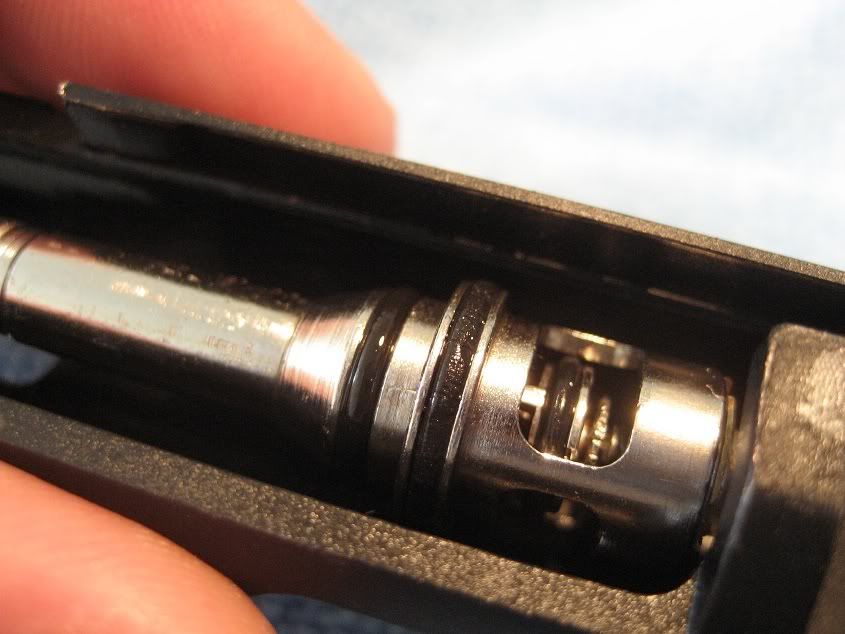 Taking a look at the nozzle, you will see three o-rings. The second from left to right may show some wear, this is ok, if it is badly cracked or about to fall off, you will need to get it replaced. It is worn because it is often pushed outside of the brass loading tube inside the upper of the rifle. You will want to put a drop of silicon on each o-ring and just gently rub it in with your finger, don't worry too much about this as they will be oiled each time you fire the rifle. It is a good habit for storage though. 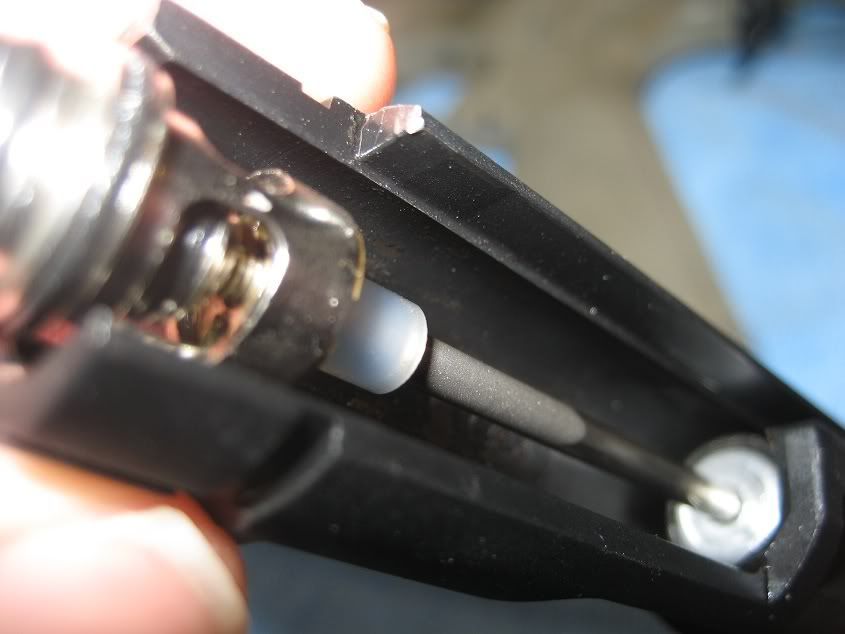 With your finger, gently pull the nozzle to reach its fully extended position, the rod you see may be dry, place a drop or two of grenade oil onto it and reinsert the nozzle back to its original position, open it up again and close it a few more times to spread the oil and ensure a good sliding motion with the nozzle. Some nozzles will fall back to the base on their own, some need a gentle push all the way back down. So long as you don't have to force it down, you should be fine. 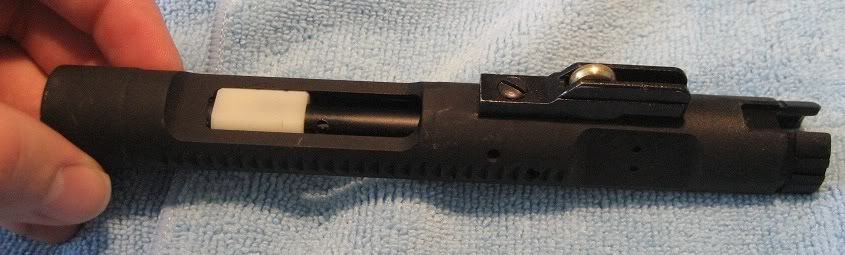 There is only one part to lube on the upper side of the bolt carrier. The brass wheel.  Lubricate the wheel while slowly spinning it on its axis. 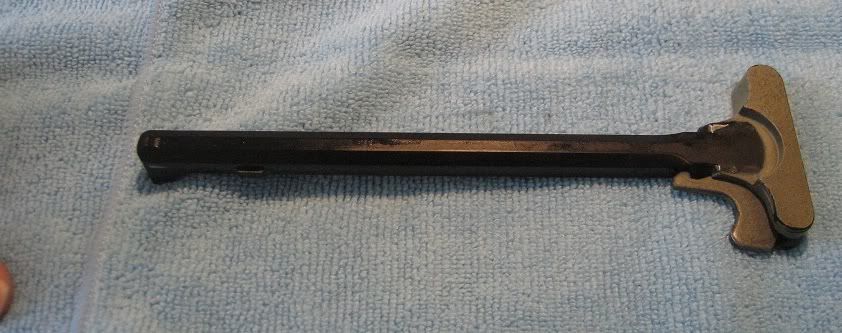 Dry off the charging handle, removing any lubrication build up and dirt. Lightly lube the entire top of the charging handle. (Shown in black in the above picture). 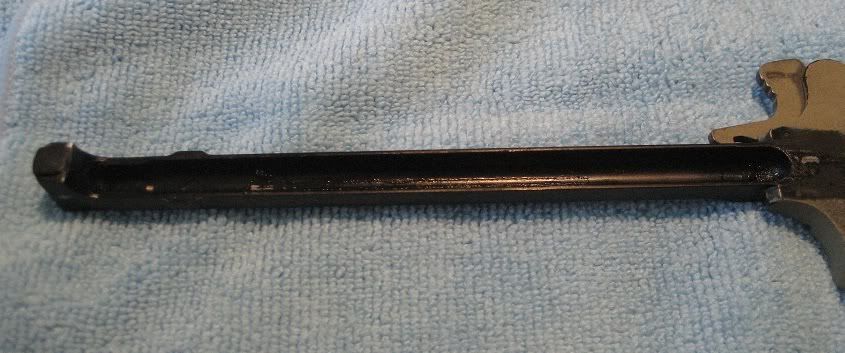 On the underside, there are two major wear areas. You can see where they are above, and marked in red below. 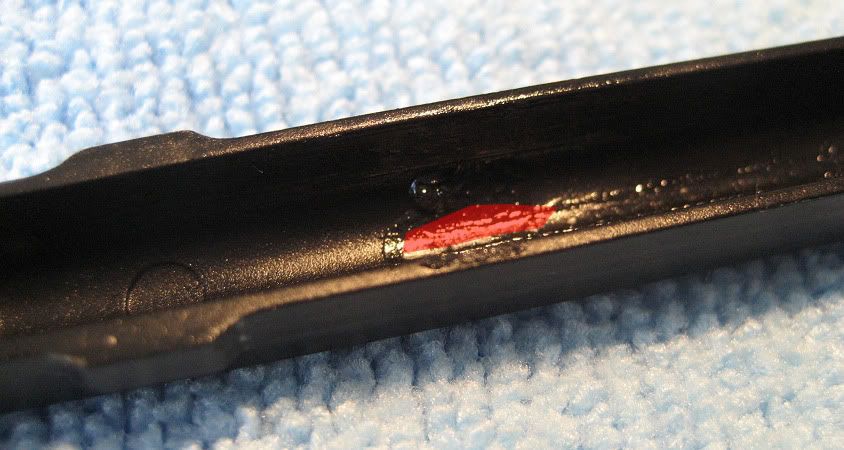 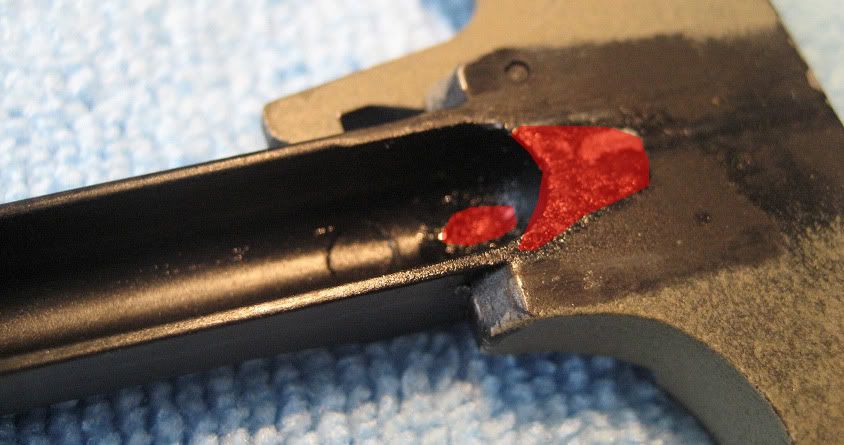 ----- 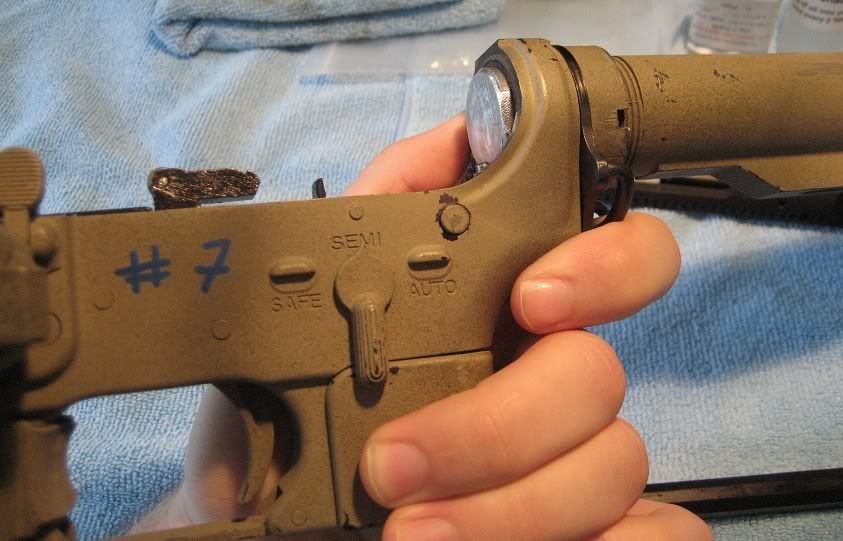 We're now going to move onto the lower of the gun. 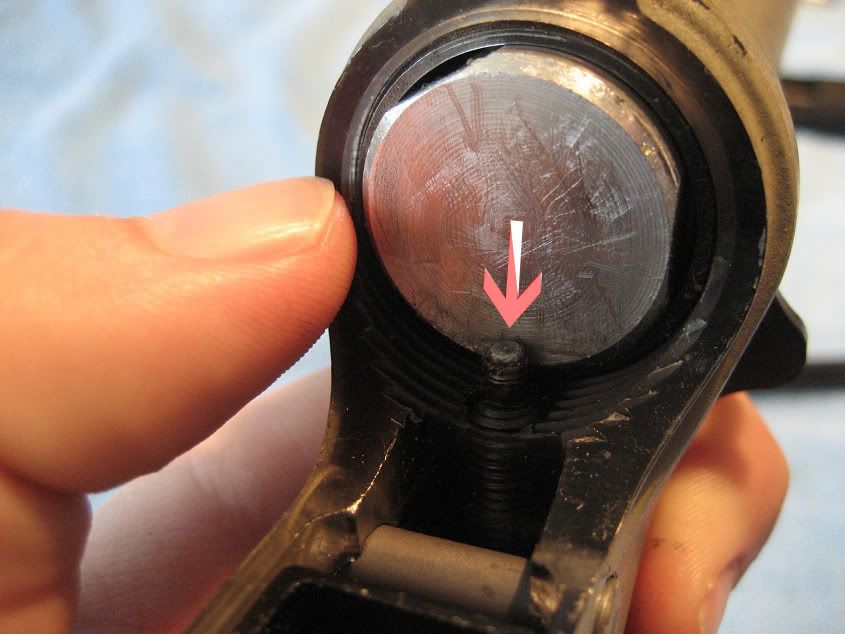 With pressure against the buffer (the large stainless steel part...), press down on the buffer pin to release it from the tube.  Keep pressure on the buffer or else it will fly out accross the room or into your eye. I'm not kidding, there is a really good amount of potential energy behind this part, and if you're in the field, it will be lost to the trees instantly. 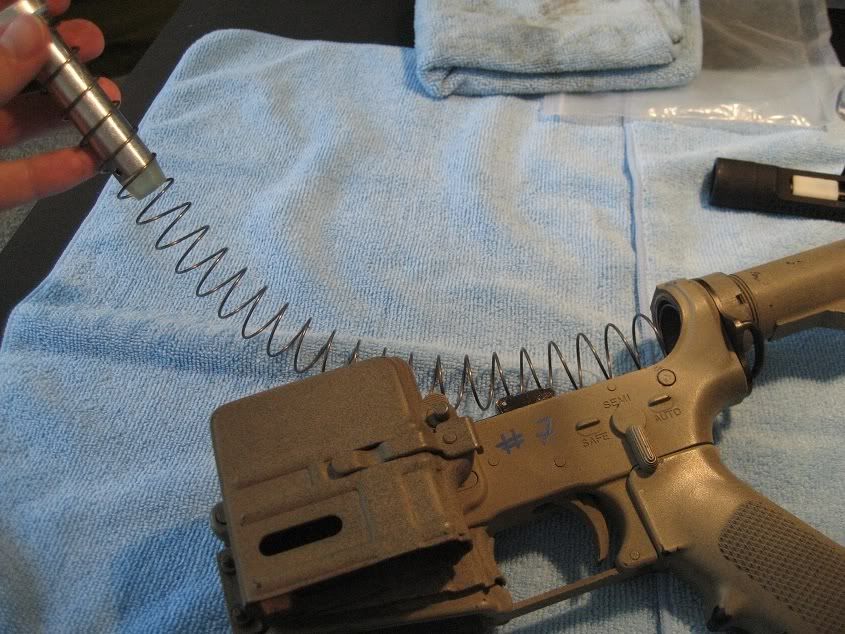 Pull out the buffer and spring from the buffer tube, and dry them off. 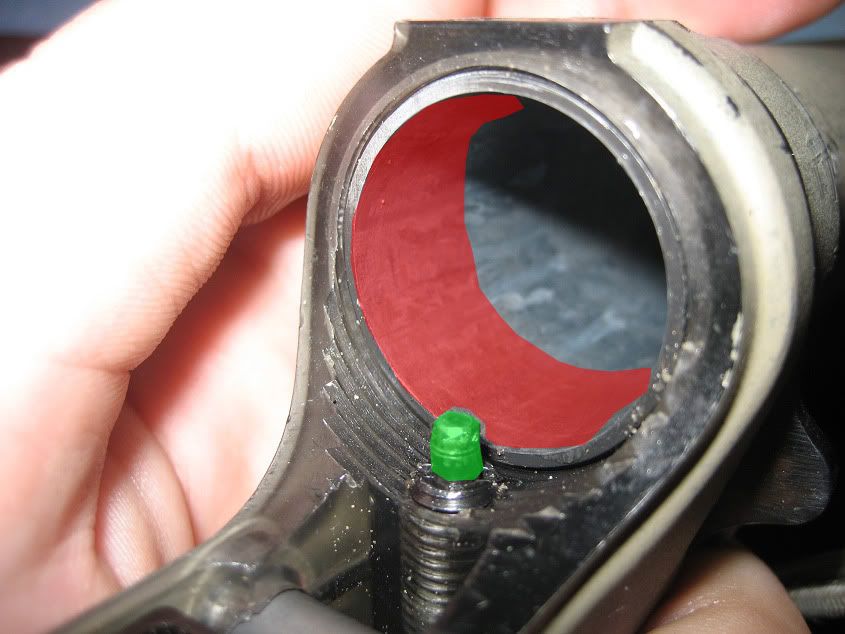 Lightly lube the Buffer pin (green), and press it a few times to ensure it. Dry out as much of the buffer tube as you can easily fit a rag down. Lightly lube the first two inches of the buffer tube (red).  Next we will take a look at the trigger group. Gently press back on the hammer so that the gun is cocked. Do not pull the trigger yet. 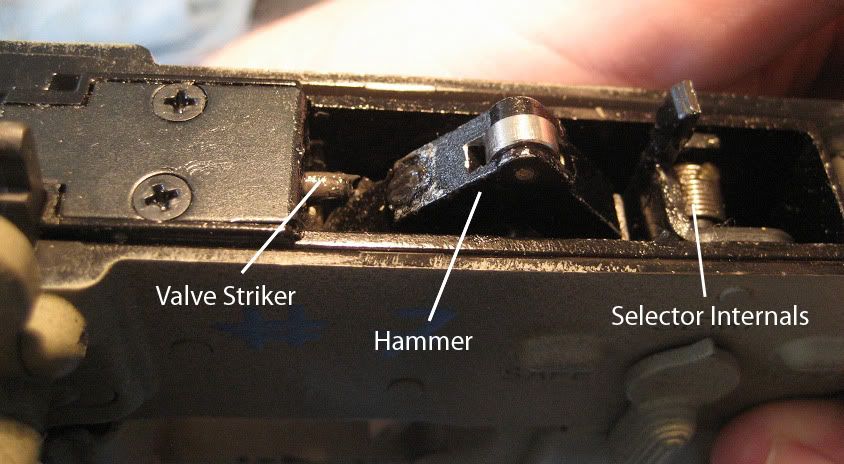 With the hammer back, you can see the hammer, valve striker, and selector switch internals. Lube them all lightly, then pull the trigger (***watch your fingers!***)  With the upper in one hand, from the rear, look down the length of it and you can see the inside of the brass tube, hop up, and inner barrel. On a gun that has been fired and not cleaned, you will notice some dirt and debris. Give the brass tube a clean with your cloth. Do not clean the hop up in a field stripped position, this is something you will need to disassemble the gun to do, but is not required for common maintenance. 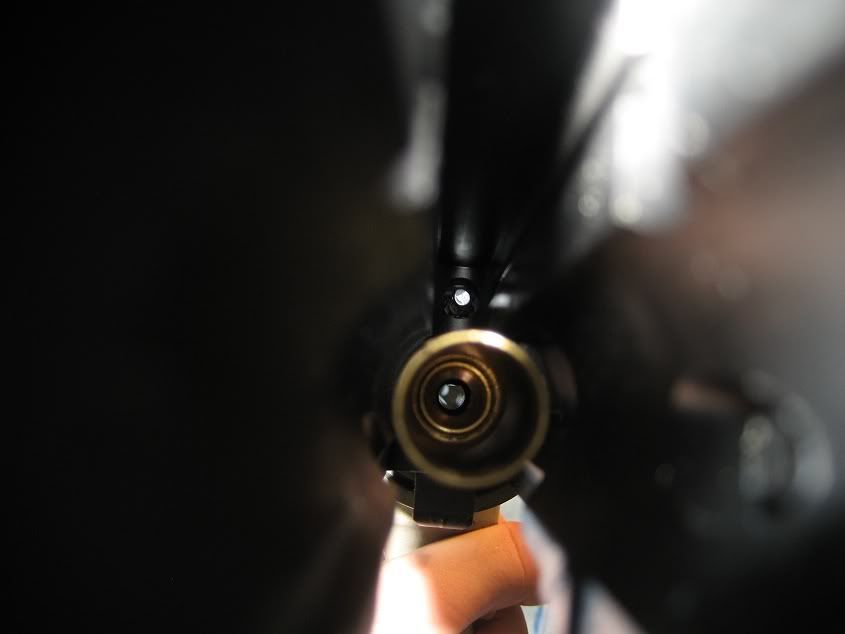 -----  Above you can more clearly see the inner barrel, and how clean it is or not. You will see specks of dirt, large and small, which if left unclean will result in the barrel oxidizing and causing perminant damage. A dirty barrel also is the cause of poor BB flight distance and accuracy. So if your gun is shooting poorly... Clean it.  Above is a barrel cleaning rod. Some WE guns come with it, some don't. You can use a real rifle cleaning rod, just make sure not to use any of the coarse wire attachments, and only the attachment shown below. 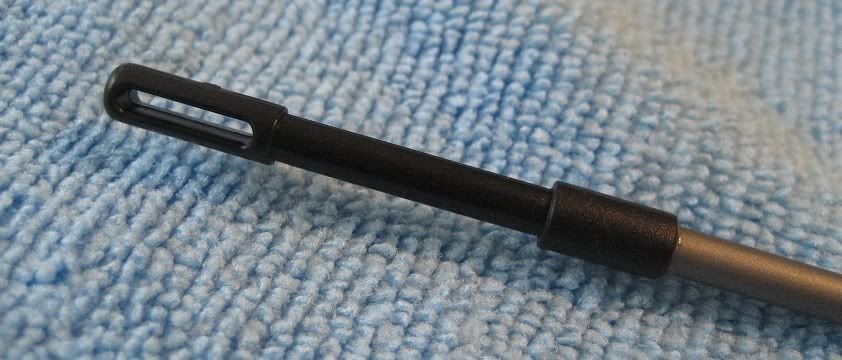 ----- 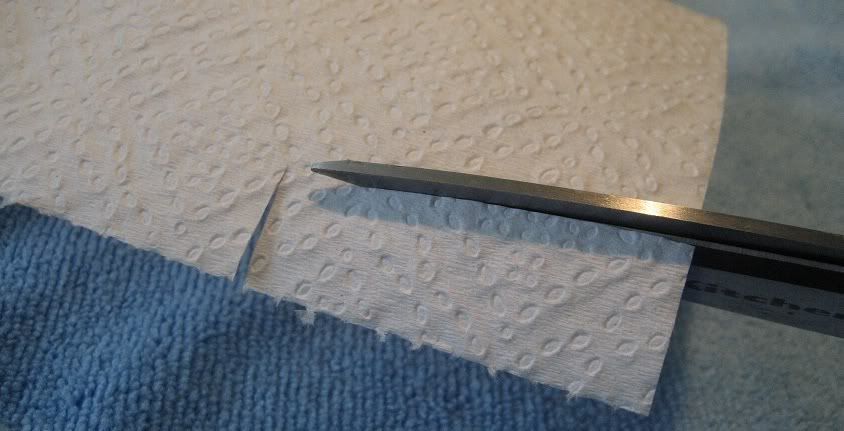 Cut some paper towel to double the width of the opening on the tip of the cleaning rod. 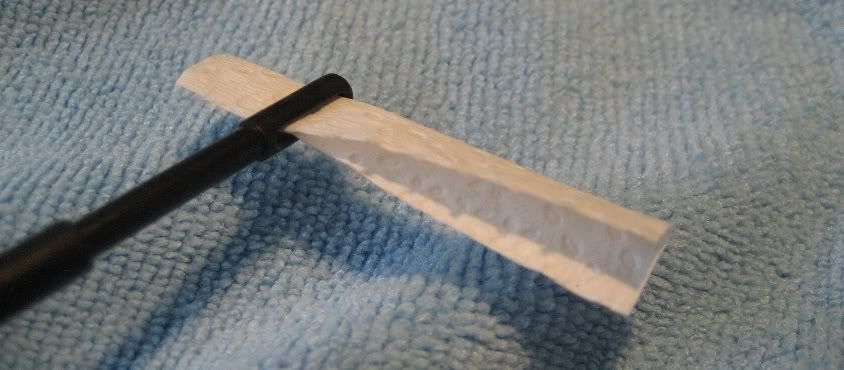 Fold the paper in half, and insert it into the rod's tip. 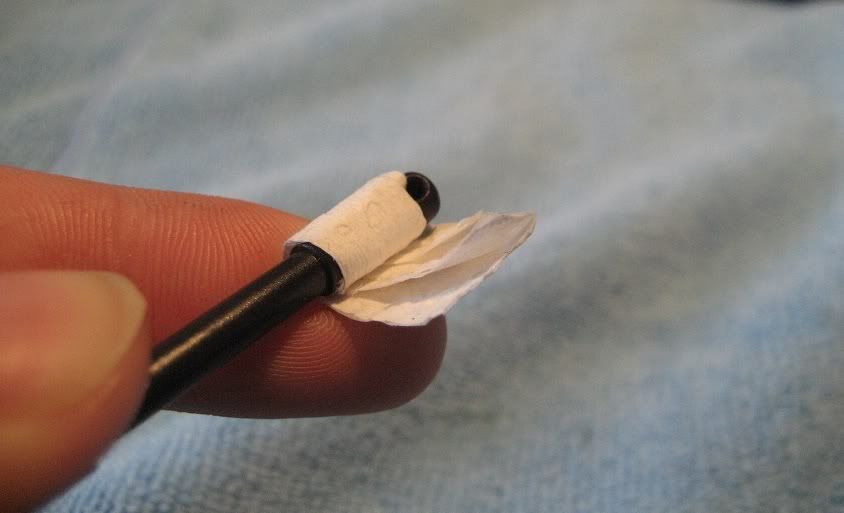 Roll the paper around the tip. 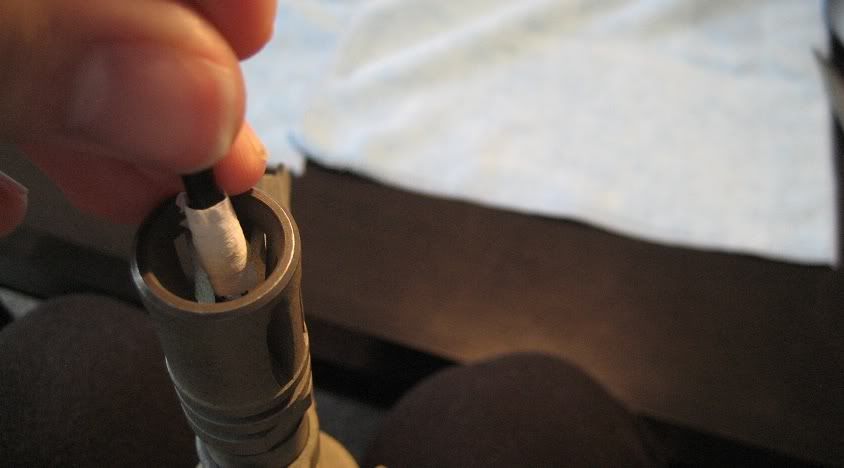 Insert the barrel cleaning rod down the front of the barrel, twisting so that the paper does not unwind. ***Do not do this from the hop up end of the barrel. You will damage your hop up. ***  Twist and gently push the rod until there is a slight resistance, this is the rod coming into contact with the hop up. ***Do not push the rod past the hop up. You will damage either the rod or the hop up.***  Observe the dirt retrieved from the barrel, inspect the barrel again and clean until all of the visible dirt is removed. ***Notes that the above is dirt from a cleaned barrel, there was no obvious dirt from inspection. Do not expect the cloth to come back clean in the end, just remove the visible dirt or until you are bored. *** 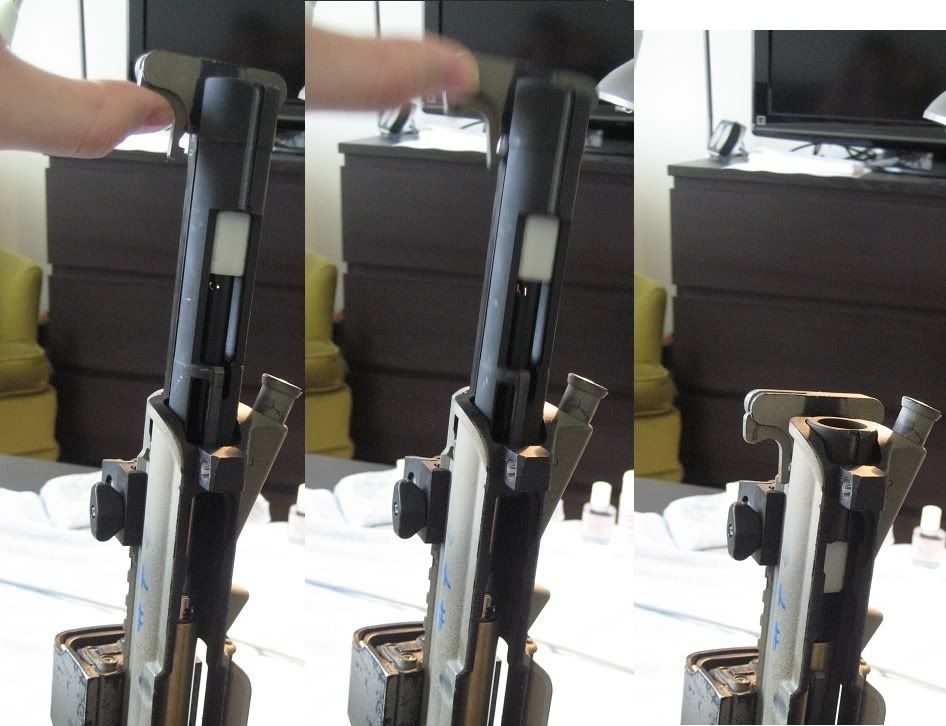 While you're putting the gun back together, take a careful note when installing the bolt carrier and charging handle into the upper. Put them back in the reverse order it was taken apart. Then, hold the charging handle at the last point in its journey back, and with the gun in an upright position, let the charging handle drop, taking the bolt with it into the chamber. On a properly lubed gun with no malfunctions or broken parts it will fall all the way to battery without getting stuck or being slow. If the bolt falls and then slows half way down but can be gently pressed into battery, continue with reassembly and rack the gun a few times to see how it all is seating, repeat the above test after everything has settled. 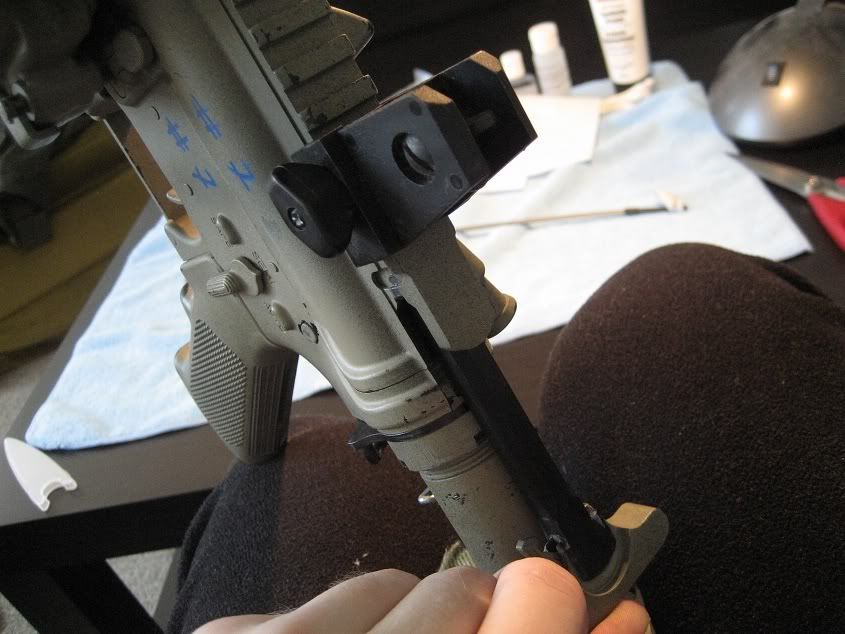 When racking the gun, rack it but do not ride it. Pull the charging handle back, and then release it at the apex of its journey. Do not follow the handle back with your hand. You want to ensure that the buffer spring is pushing with enough force (and with the least resistance due to lubrication) to put the bolt into battery. 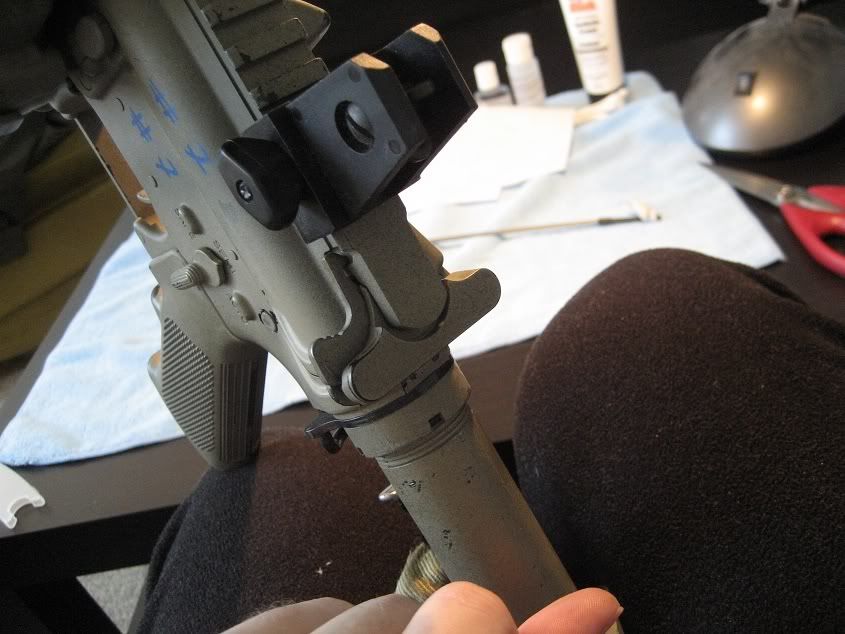 ----- Magazine Care ----- Mag care is all a bit hit and miss. I'm very rough on my gear, but I take the time at the end of a day to maintain things like mags and the gun... Before I go to a game I put a drop of silicone oil in the fill valve (this is wear the propane goes), and then fill the mag with propane. I do a quick check of the exhaust valve (near the feed lip) to make sure not too much dirt or rocks are in it. Then I load my BBs and put the gear in my bag. When I get to the game, I ensure there is pressure on the knocker valve (the brass part that causes the release of the gas from the exhaust valve), by pressing on it to ensure there is resistance. You don't want to press hard enough to release gas. This is just to ensure there is no leak in the mag from home to the game. Better to find out your mag leaks BEFORE the game, than after. Personally, I put a drop of silicone oil every 60 rounds through the magazine, into the fill valve. At the end of the day, I take the time to empty any BB's left in the magazines (either by firing them, or by flicking them out with a knife (carefully!)). I then add 1 drop of silicone oil and fill the magazine with propane for storage. When I get home, I store my magazines in a cool, dry place (closet out of direct sunlight), and start the routine over the next time I go to a game. I will update this section with pictures in a week or three...  ----- Conclusion This concludes the first draft of my cleaning guide for the WE AWSS M4 (Ver 3). If you have any questions, feel free to email me suggestions at shelledpants at gmail dot com, or contact me on www.airsoftcanada.com
__________________
  Ár skal r?*sa, sá er annars vill fé eða fjör hafa. Sjaldan liggjandi úlfur lær um getur né sofandi maður sigur. Last edited by ShelledPants; November 13th, 2010 at 13:10.. |

|

|
|
May 14th, 2010, 17:30
|
#2 |
|
I am manly hear me squeek
|
Great job man easy to follow and full of helpfull tips for GBB newbs
__________________

|
|
|
|
|
May 14th, 2010, 21:55
|
#3 |
|
Tys
|
Great write up Tom
|
|
|
|
|
May 14th, 2010, 22:18
|
#4 |
|
oO?
|
i like the images that accompany the directions to follow. It helps to see what parts being specified to maintain. Great work!
__________________
 "SI VIS PACEM, PARA BELLUM" |
|
|
|
|
May 16th, 2010, 11:40
|
#5 |
|
Perroz Designs
|
Really nice! Now can someone do this for G&P GBBRs?
__________________
 
Last edited by MilanWG; May 16th, 2010 at 14:06.. |
|
|
|
|
May 17th, 2010, 19:22
|
#6 |
|
Wanna buy some Nod's? #StolenValour

|
Awesome...Sticky Please
__________________
ΜΟΛΩΝ ΛΑΒΕ |
|
|
|
|
May 24th, 2010, 05:32
|
#7 |
|
Awesome!
Thanks a lot for putting this up. |
|
|
|
|
|
June 18th, 2010, 15:41
|
#8 |
|
As the internals are different, you wouldn't happen to have a cleaning guide for WE PDW in hand would you? :P
|
|
|
|
|
|
June 18th, 2010, 16:05
|
#9 | |
|
8=======D
|
Quote:
__________________
Brian McIlmoyle TTAC3 Director CAPS Range Officer Toronto Downtown Age Verifier OPERATION WOODSMAN If the tongue could cut as the sword does, the dead would be infinite |
|
|
|
|
|
June 25th, 2010, 13:27
|
#10 |
|
|
As Brian said, I don't own a PDW or a SCAR, but he does. I'll snag some photo's of the guns and add it as a footer. The lower is basically the same, less the buffer tube.
__________________
Ár skal r?*sa, sá er annars vill fé eða fjör hafa. Sjaldan liggjandi úlfur lær um getur né sofandi maður sigur. |
|
|
|
|
July 3rd, 2010, 04:29
|
#11 |
|
I think this guide is super helpful, thanks alot for making it!
I was wondering if anyone had tips on stopping the flash hider and front sight from rusting? I've gamed mine twice and the flash hider is starting to rust, and the front sight is the same metal, so I suspect it can rust too.
__________________
Website - www.parttimekillers.org Youtube - www.youtube.com/PartTimeKillers Facebook - Part Time Killers (PTK) Email/msn - parttimekillers@live.com Home field - www.defconpaintball.ca |
|
|
|
|
|
July 3rd, 2010, 22:04
|
#12 | |
|
8=======D
|
Quote:
__________________
Brian McIlmoyle TTAC3 Director CAPS Range Officer Toronto Downtown Age Verifier OPERATION WOODSMAN If the tongue could cut as the sword does, the dead would be infinite |
|
|
|
|
|
July 3rd, 2010, 22:27
|
#13 |
|
|
Duracoat your gun and it will not rust

|
|
|
|
|
July 3rd, 2010, 23:33
|
#14 | |
|
|
Quote:
__________________
"Hey I'm the first one to say its a great country but its a straaaaange culture. This is a place where gun store owners are given a list of stolen credit cards but not a list of CRIMINALS and MANIACS. And now they're thinking of banning toy guns...AND THEY'RE GONNA KEEP THE F**KING REAL ONES!" -George Carlin 1937 - 2008 (RIP buddy) |
|
|
|
|
|
July 26th, 2010, 12:44
|
#15 |
|
|
Added Magazine Care to the bottom of the guide. Enjoy. Pictures to come in a month, I'd guess.
__________________
Ár skal r?*sa, sá er annars vill fé eða fjör hafa. Sjaldan liggjandi úlfur lær um getur né sofandi maður sigur. Last edited by ShelledPants; July 28th, 2010 at 03:56.. Reason: unnecessary personal info. |
|
|
|
  |
|
||||||
| Bookmarks |
|
|
 |
|


